Blue Skies and 100 Tripods
This past February, I had an opportunity to explore and photograph some of the wondrous beauty of the Southwest. The main attractions for my first-time visit there were Zion National Park in Utah and the many amazing photographic sites around the Page, Arizona area, which included Horseshoe Bend, Antelope Canyons, Vermillion Cliffs, and Wahweap Hoodoos, all within close proximity from the town of Page.
My travels started from my hometown of San Francisco where a friend (and fellow photographer) and I flew into Las Vegas, rented a car, and drove to Zion National Park first to capture the Narrows. After Zion, we traveled to Page, Arizona where we stayed for three nights. The town of Page has all the amenities for visitors to have a comfortable stay and a wonderful experience. There are plenty of affordable lodging establishments, restaurants, supermarkets, and numerous guided tours to help you get the most out of your trip.
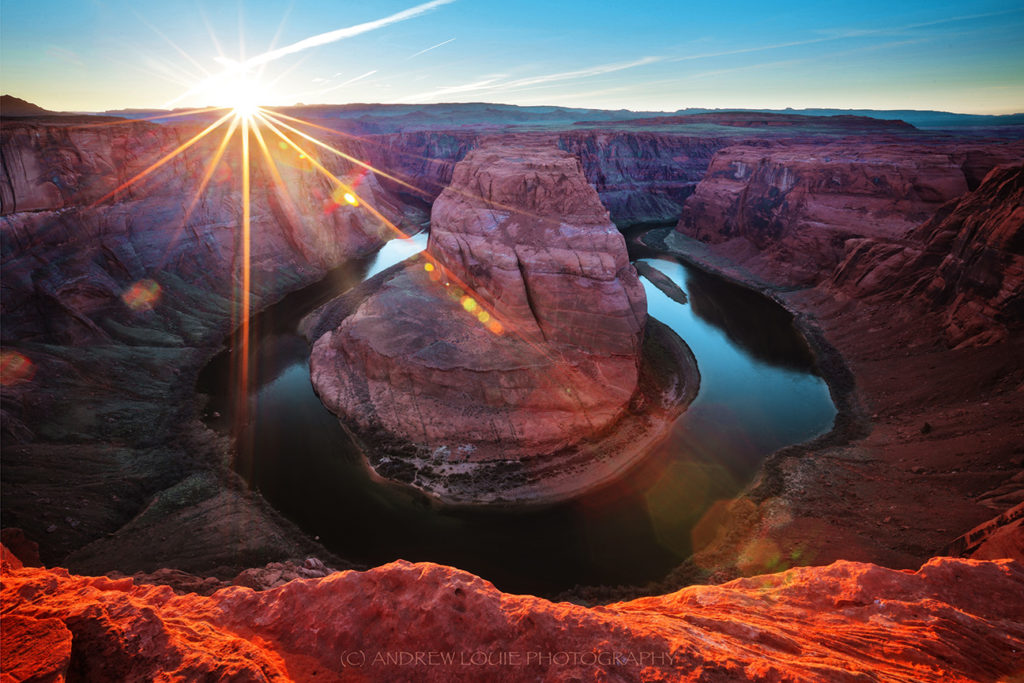
The focus of my share on this blog is my first-time experience with photographing Horseshoe Bend. I’d learned that it is the most photographed landmark in the Southwest, so I was thrilled to include it in my travels. I’d seen many amazing photographs of Horseshoe Bend, some with dramatic storm clouds, some with epic sunset skies, and some recently with snow-covered grounds on the morning of New Year’s Day 2015. But to be honest, my expectations were deflated when the weather forecast called for sunny and clear skies for the three days that we were scheduled to be there. Without cloud texture, it meant there would likely not be anything dramatic or even colorful to photograph. Nonetheless, I was committed regardless of the weather to go and just check it out.
Horseshoe Bend is conveniently located less than 2 miles from Page. Once you get to the parking area, it’s a 10 minute hike to the rim of the Bend, a pretty easy walk with a gazebo about halfway down if you need to take a breather.
The day we were there could easily have been the busiest day in Horseshoe Bend’s history. It was on a Saturday during a three-day President’s Day weekend which included Valentine’s Day! It was sunny and warm with clear blue skies and the parking lot was filled with some 100 plus cars and buses. It was about two hours before sunset when we got to the rim of the Bend and the place was just packed with photographers waiting for sunset and mobs of families out enjoying the grand scenic view. There were easily close to 100 tripods stacked next to one another, but we still managed to get set up with minimum effort and without accidentally pushing anyone off the rim in doing so! Amazingly, there was plenty of room for everyone despite the mob scene.
I must admit it was pretty dicey to stand straight up at the edge of the Bend as there was nothing between you and that 1,000 foot drop to the bottom of the Colorado River. Strategically, and for safety, I composed my image about 24-inches off the ground while sitting with my legs crossed. I used the rocks from the edge of the Bend as my foreground, which I hoped would catch some golden light as the sun set. I also positioned the foreground rocks to frame the shot in a way that would camouflage some of the less attractive boulders located at the bottom of cliff. To enhance the color of the clear blue skies, I used a polarizer. Multiple images were taken with and without the starburst and flares, but I finally decided to leave them in as they helped make the resulting image pop!
I have to say, despite the clear blue skies and overcrowded conditions at Horseshoe Bend, I had a really great time photographing it and enjoyed the energy and vibe created by the crowd.
Horseshoe Bend is truly a unique and monumental landmark to photograph. I love the fact that the place is so easily accessible and due to its impressive size, is able to accommodate the masses. From my experience, there’s truly not a bad spot to set up for a shot there. I would recommend shooting during sunset when the light appears to be most vibrant. In all, I am grateful and delighted to have walked away with the image that I ended up with and to have this opportunity to share it with you all!
Happy photography shooting and safe travels, everyone!
Andrew
Tripod: MeFoto Globe Trotter (with shutter release cable)


Thanks for sharing your wonderful pictures.