Congratulations on knowing about one of the most photogenic locations in the United States!
Instead of giving you a standard tutorial I would like to paint a story in your head.
It all started in Mesa Arizona. I had recently moved from beautiful South Lake Tahoe, CA ( my home town) and moved to Arizona to be with my girlfriend who was attending school at ASU.
I knew that their would be plenty of photo opportunities in Arizona and was excited to plan my next adventure.
While searching the internet for photo permits for Antelope Canyon I started looking at google earth to see what the canyons looked like from above. After searching for a while I found the huge horseshoe shaped bend in the Colorado river.
I instantly searched ” Horseshoe Bend” in google and there it was, actually named horseshoe bend. I was so excited to go check it out I grabbed my girlfriend and we packed all of my camera gear, some pillows and blankets into my Subaru Forester.
We left at 8pm from Mesa and Arrived at Horseshoe Bend around 11:30pm with plans to car camp and wake up early for sunrise. Once we got there I just couldn’t contain myself and had to go check it out even though it was dark and kind of creepy out.
I grabbed my headlamp and my camera gear and made the 10 minute walk down to the edge of the Bend.
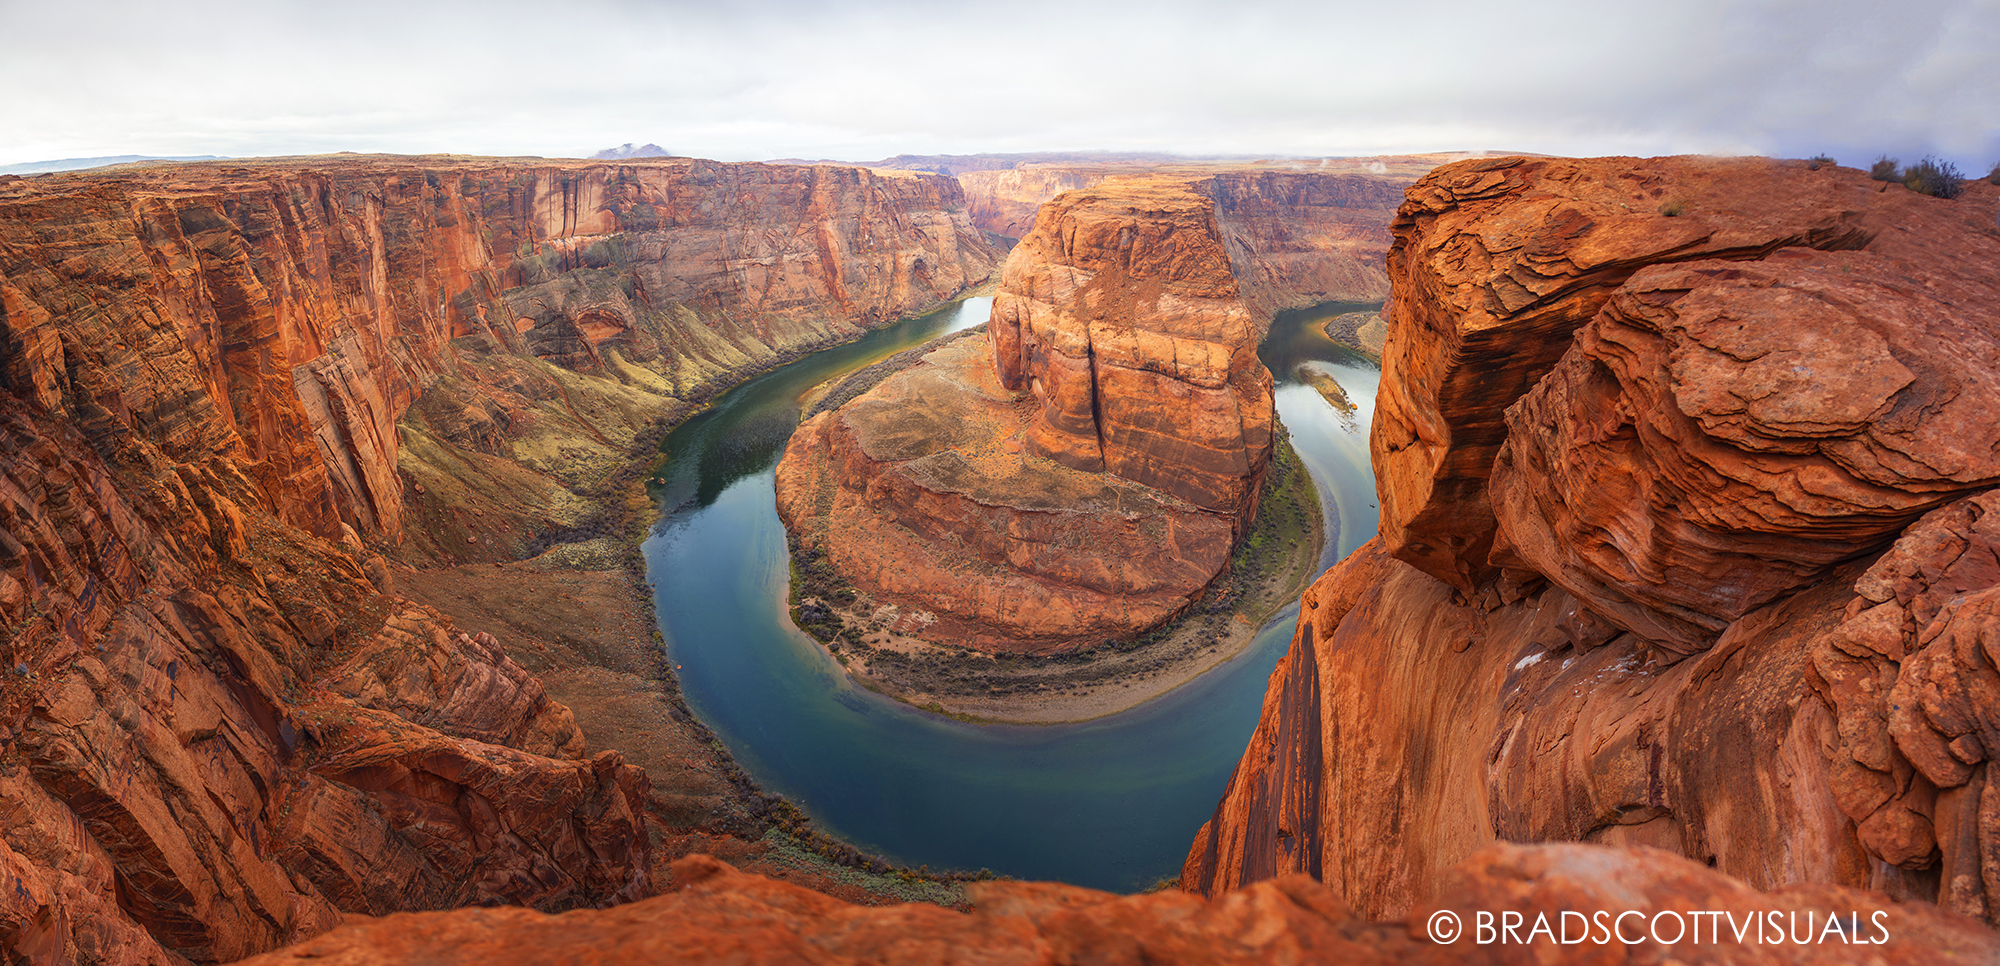
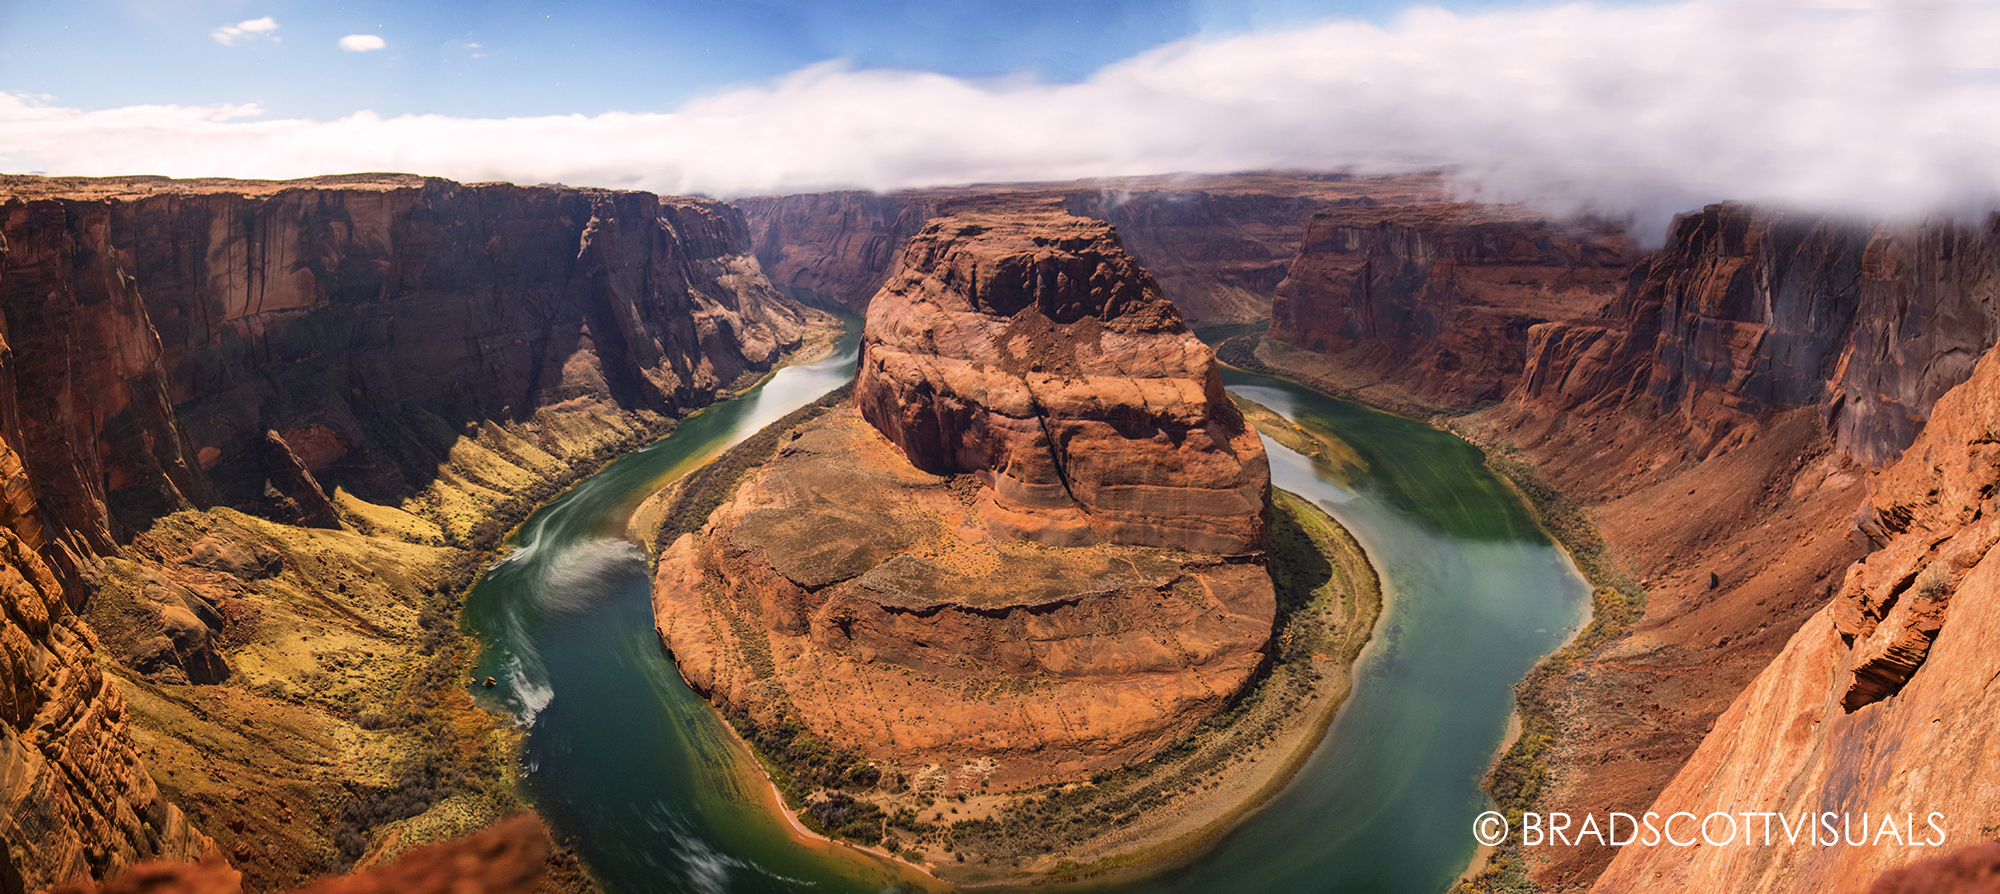
My first thought when the Horseshoe Bend finally came into full view was WOW this place is Massive. Looking at a google earth image as well as other photos you see online just doesn’t do this place justice. Horseshoe bend is mind blowingly Beautiful.
When I was finally done taking in the view for myself and lifting my jaw back up off of the floor I pulled out my Canon 6d and my Panasonic GH4.
The lowest focal length I had with me for my Full Frame Canon 6d was 35mm and I had a 12mm Olympus m zuiko f2 on my Micro 4/3rd sensor Panosonic GH4.
Now 35mm can usually cover quite a large landscape scene but horseshoe bend was a whole new beast. Looking through the view finder of my Canon 6d I could only see about half of the whole bend of the Colorado River.
I set my GH4 up on a higher ledge and was able to barely fit in the whole bend and was happy with the composition but would have preferred a wider field of view.
I had my GH4 set on 2 second intervals for most of the timelapses. I then use adobe camera raw to apply the same adjustments to all images and put them into a 24fps video sequence with Adobe After Effects.
Biggest tip for horseshoe bend if you don’t want to stich photos in post is bring the widest lens you have!
For those of you who don’t own a good super wide here are a couple of different techniques I use for stiching panoramas that I have had some great results with.
Make sure you are shooting in RAW for best results using these techniques.
#1 Landscape mode stitching
Start in the upper left hand corner of where you want your panorama to begin. Take photos from right to left using a shutter release cable or a timer to reduce camera shake. Going from right to left take photos until you reach the farthest right point of the image you want to capture in the panorama but remember to overlap each image by at least 1/4th. Try to make sure that you start your first row high enough to capture the full sky and make 3 to 4 rows moving across and then down like a type writer. Make sure that your camera is set to Manual exposure with an fstop f.11 or higher to be sure that the whole panorama is in focus for post processing. Be sure that your white balance is set to manual as well and not automatic white balance.
#2 Portrait Stitching
Basically the same as landscape but only one row and less photos taken. Use the long end of your cameras sensor to fill capture the sky as well as the foreground you want in your finished panorama and shoot from right to left making sure to overlap your images by at least 1/4th.
Post Processing in adobe camera raw and Photoshop CS6/CC
Step 1 – Open up your images in Adobe Bridge to select all of the files.
Step 2 – Select all files in Panorama and right click selecting “open in Adobe Camera Raw”
Step 3 – When all images are opened in Adobe Camera Raw click ” select all ” to edit all images at once.
Step 4 – Adjust the photos to your liking and open in Photoshop
Step 5 – In the Photoshop menu Select File – Automate – Photomerge
Step 6 – Once in the photomerge application I like to select Spherical and click Add open files.
Step 7 – Once photoshop is done creating the final panorama flatten the layers of the image by selecting Layer – flatten image
Step 8 – Your photo will most likely need some distortion correcting so go to Filter – Adaptive Wide Angle and drag the cross from one end of the horizon line to another to straiten out the image. When you are happy with the Panorama you can crop it and color correct to your liking.I found that the most fun times to shoot Horseshoe Bend are at night ( Not too many people ever get these shots ) or at Sunset time. Sunset will give you the best color and light. Sunrise isn’t as spectacular.
My biggest tips for horseshoe bend are to get there well before sunset to secure the spot you want as well as bringing a sturdy tripod that allows you to adjust the legs wide and low to look out over the cliff as well as bring the widest lens you have.
Enjoy your trip to horseshoe bend!
You can check out more of Brad Scott’s work and tutorials at: